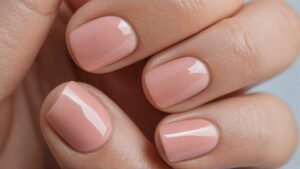
Professional manicures can be expensive and time-consuming, but with some know-how, you can easily give yourself one at home and still achieve the look and durability of a salon manicure.
Note that nail polish needs to dry thoroughly before being touched. Wear waterproof gloves when doing chores or using the sink, and try not to expose your nails to blow dryers and hot water, as these can potentially cause irreparable damage.

Start with Clean Nails
Although it may seem obvious, starting with clean nails is a must. “Even if you are just wearing clear polish, use a cotton ball of nail polish remover to ensure that all oil or dirt particles that could cause your polish to chip have been cleared away,” according to Wnek.
After cleaning, it’s advisable to apply a base coat. “Not only does this prevent staining from the nail polish color itself,” notes Dr Prystowsky; furthermore, it helps create more vibrant hues that last longer and ensure the manicure stays looking its best!
After filing your nails into their preferred shape, file them to achieve the desired effects. Singleton suggests filing them with rounded nails extending slightly past each finger’s tip for a polished and refined appearance. After that, add clear polish as an extra step to add shine to both hands.
Add simple yet chic accents to your manicure with small gems or pearls on the nails for a quick upgrade that won’t look like you spent hours doing your manicure! Remember to use a quick-drying topcoat so the embellishments don’t chip or come off during the day!
Prep Your Cuticles
Cutter cuticles are integral to nail care at home, whether you are just beginning or have been doing your nails for some time. Proper techniques and precautions must be taken to avoid damaging nail beds or infection.
First and foremost, make sure your tools are clean and sterilized. Cuticle nippers and pushers come in metal, plastic, and orangewood (for states that don’t permit the use of metal tools). Gloves should always be worn when handling harsh chemicals or cleaning products. Keeping nails and cuticles moisturized also promotes healthy nail growth—try using cuticle oil or rich hand cream on a regular basis to ward off dryness and keep your hands hydrated.
To trim your cuticles, carefully use a cuticle pusher along the free edge of the nail bed near where your cuticle meets its nail plate and just past its corner of pinkish skin (called an eponychium ). Press down firmly but gently on it while moving the edge of the nail back towards its cuticle; avoid pushing too far back as this could lead to infection and could lift or peel away nails altogether.
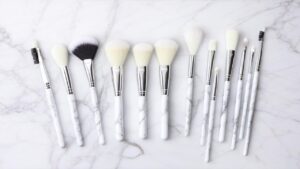
File Your Nails
Maintaining perfect nails at home is easier than you think! By leveraging some basic tools and steps, you’ll soon be able to give yourself an expert manicure that rivals or exceeds what can be found at salons – starting with filing.
Start by ensuring your nails are completely dry before filing them. “When they’re wet, their flexibility increases significantly, and fibers can easily be damaged,” according to Roseann Singleton of Manicurist’s Roseann Singleton Manicurist. Additionally, choose a nail file suitable for natural nails – one with an angular shape soft file should do nicely; glass or crystal is often better as these materials offer increased stability while still not scratching your nails!
When shaping your nails, always use long strokes with the file in one direction – switching it back and forth can weaken them and make them more vulnerable to cracking or breaking.
Apply a Base Coat
A base coat is like a primer before painting on a wall or canvas before creating masterpieces; it provides a smooth surface for nail polish to adhere to. Without it, your nails would be exposed and vulnerable to staining, chipping, peeling, and discolouration. By including this essential step in your manicure routine, you can enjoy vibrant colours that last longer and look flawless!
Base coats provide more than just a sturdy foundation; they also help nail colour go on more evenly and smoothly. It is best to apply one thin layer; too much product may lead to uneven drying and smudging of nail colour.
Nail Artist Mia Rubie suggests using short strokes when applying nail polish, moving from the base of each nail to its tip. For glitter applications, Vlogger Kelli Marissa suggests saturating a makeup sponge with colour before using it instead of brushing directly on your nails; this allows the colour to soak into the sponge more fully, resulting in dense and opaque coverage all at once.
If your nails are rough or peeling, try adding cuticle oil to your base coat for added nourishment and health benefits. Some varieties even provide vitamins, proteins, and calcium, which support nail health.
Apply a Top Coat
Top coats serve multiple functions. They protect your nails from chipping, extend the longevity of your manicure and add shine while simultaneously sealing in polish to allow you to touch them without ruining their look.
A top coat can be a lifesaver in nail art and painting projects when something is amiss. Instead of redoing everything from scratch, simply apply a thin layer of top coat over the problem area before curing, as usual, to cover up imperfections and give your manicure a professional appearance.
Top coats help your nail colour stand out and create matte or gloss effects. Wait for your manicure to be fully dry before adding another top coat!
Applying a base coat and top coat may be wise before beginning nail art if you’re new to gel polish. Since gel must dry fully before removing it, it is key to be on time when applying these layers if you want your manicure to come out perfect. The more mindful you are when doing your manicure, the greater your success will be!
Apply Nail Polish
Mastering nail art at home requires perfecting your technique with a nail polish application and taking some time and practice before reaping its rewards. Once buffed and prepped, apply a clear top coat to prevent chipped hues from entering the surface.
Add a thin coat of ORLY Gel FX nail polish, taking care to cap off the free edge of each nail (please refer to our Nail Polish Application blog for more information on this). Without protection for these edges, they’re more prone to lifting than normal and allow water or debris under your colour, which causes them to smudge or chip more quickly. Capping free edges helps prolong wear time and preserves integrity longer.
When applying nail polish, be sure to use short and small strokes—too much polish can lead to an unappealing and uneven finish! Additionally, take extra caution not to touch your cuticles, as doing so could cause the polish to lift and chip prematurely.
When your nails are completed, use ORLY Cuticle Oil to hydrate your hands and add an elegant finishing touch. As you wait for them to dry completely, appreciate your hard work.
Add a Finishing Touch
Consider investing in a top coat like Sally Hansen’s Miracle Gel ($13) that dries within 30 seconds and features an LED light to keep nails sparkling for days – or try Essie Fast Forward ($20).
At the end of it all, don’t forget to add some special details (nail art or gems) to your manicure—be it nail art or embellishments—as an accent piece will add polish and class to your hands. Kandalec recommends adding small pearls or large gemstones as they “can really elevate the look.” However, you must ensure they won’t pierce through the nail; otherwise, they should be safe.
These expert-backed tips and tools can help you achieve salon-quality manicures without breaking the bank. But don’t stop there—maintain them every other day with a quick layer of topcoat to extend their wear. When it’s time to switch up your style again, just remember the cuticle oil to protect newly polished fingers from drying out again.