
Pedicures are more than just beauty treatments; they’re also good for your feet! A professional pedicure will remove odor-causing bacteria, dead skin cells, and calluses while increasing circulation for improved blood flow and enhanced foot health.
At first, trying your own pedi at home may seem daunting, but the process is much simpler than expected. Just follow these simple tips for a spa-quality pedicure for your feet.
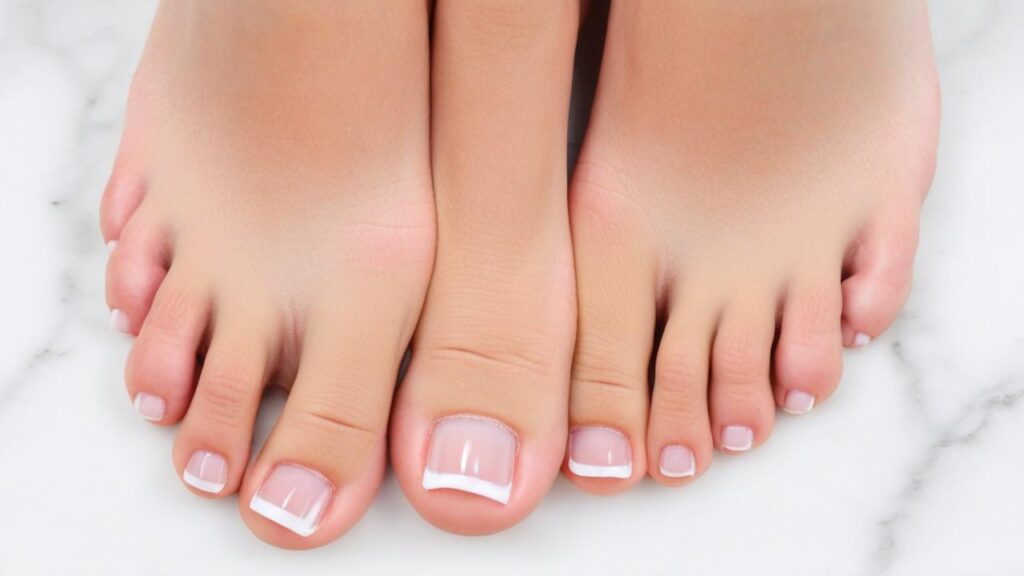
Prepare Your Supplies
Do your best to prepare before arriving at the nail salon; doing so will lead to more satisfying and effective services. Have your supplies, including candles and soothing music, to create an ambiance for a DIY pedicure station at home.
Fill a tub or foot spa large enough to hold both feet with warm water and add soothing ingredients—like sea salt and eucalyptus essential oil—for extra relaxation. Sundays’ founder recommends this.
Soak your feet for 10 minutes or so, and use a manicure stick or orangewood stick to gently push back the cuticles with your manicure stick or orangewood stick. Don’t cut your cuticles; doing so could result in damaged or ragged nails; leave this task for professional nail techs instead. After massaging some cuticle oil, such as Essie Apricot Cuticle Oil, to keep nails healthy, apply a base coat to prevent chips in the polish later.
Soak Your Feet
Starting any good pedicure is with an effective soak, designed to soften tough skin and cuticles for easier grooming steps ahead. Fill your favorite pedicure basin (or regular bathtub) with warm water, adding soothing bath salts or essential oils like tea tree oil for an enhanced experience.
Once soaked, use a gentle soap or foot cleanser to scrub away dirt and dead skin cells that have accumulated after soaking. This will aid the next steps more smoothly while also helping prevent infections or fungal growth between salon visits.
An alternative option for at-home foot soaks is mixing vinegar with warm water. This antimicrobial foot soak leaves skin feeling fresh. Just be sure to rinse away and dry completely afterward!
Trim and Shape Nails
Trim your nails to the length you prefer using nail clippers and file. Choi recommends trimming long nails to resemble their natural shape (usually somewhere between round and pointed) to reduce the risk of ingrown toenails as they grow longer.
Once your nails have been trimmed, use a nail file to gently soften their edges and prevent any bumps or snags from forming under your polish. Doing this will also help avoid any unwelcome bumps emerging during painting sessions.
Once filed, use a cotton ball saturated in non-acetone nail polish remover to cleanse each nail of any oils or residue that could prevent its polish from adhering properly. Although this step is optional, it will ensure your pedicure lasts as long as possible. Finish it off by applying a base coat that prevents any color from chipping too soon before adding a clear top coat; one that contains shea butter and avocado oil might even make this more durable top coat option an even better idea.
Care for Cuticles
After completely drying your nails, apply a thin coat of cuticle oil. This step helps prevent your polish from chipping prematurely; nail oils can be found at beauty supply stores or drugstores; however, basic vegetable oils (olive, jojoba, or apricot oil are suitable alternatives). Using darker nail polish hues is essential since staining or yellowing could occur otherwise.
Cuticles are small strips of skin found at the base of your nails between your lunula and eponychium that contain living skin cells. It’s important to properly maintain and care for your cuticles to avoid bleeding, ingrown toenails, or infection from cutting them or over-filing. Instead, Yankee recommends gently pushing back skin with a soft pusher; any too harsh could cause microtrauma; gentle pumice stone scrubbing can also be an effective alternative to harsh grater styles like harsh graters – gentle pushers don’t hurt either!
Exfoliate and Smooth Skin
Pedicures may be best known as relaxing spa experiences. Still, they also serve a practical purpose: pedicures can trim and shape nails, remove calluses from feet, and clean both skin and nails simultaneously.
Regular pedicures can help protect and promote the health of feet by helping to avoid infections and detect any changes or abnormalities in their appearance.
Avoid overexfoliating your skin to protect its delicate structure. Exfoliate only as needed to shed dead skin cells and soften your feet; excessive exfoliating could result in irritation, redness, and even cracking of the foot skin.
Use a foot scrub or exfoliating brush to eliminate dead skin and calluses on your feet. Beware of using razors or other tools that could cut into the soft skin of your feet! Once exfoliating is complete, be sure to moisturize your feet using something such as Adessa-30 Heel Liniment, which contains shea butter, jojoba oil, and other essential oils to hydrate them further and maintain their suppleness.
Moisturize Your Feet
While you soak your feet, apply a thick body lotion with rich nutrients to your toes and ankles to keep skin hydrated after all the scrubbing and soaking and smooth rough spots and calluses. This will also help soften rough patches on callus-prone spots!
If you’re in a rush, an esthetician such as Leanne Fagan suggests using a nail polish remover pad saturated with rubbing alcohol to quickly clean each nail surface, suggesting this product is a quick, safe, and efficient way to use at home.
Once your nails are dry, Brittney Glass recommends applying a layer of cuticle oil. This will hydrate your cuticles and extend the color of your pedicure – it should also help hydrate feet that may have become rough over time! She suggests choosing one from a wellness brand packed with essential fatty acids for soft, healthy feet.
Prep Nails for Polish
At-home pedicures require polish as the last step, with several layers applied before proceeding to prevent clumping and streaking. Applying cuticle oil before painting your nails can also help keep them from lifting, explains esthetician Sana Dhanani.
She recommends applying oil with a cotton pad (not a ball) and leaving it for 60 seconds before pushing back cuticles using either metal or wooden nail pusher sticks. You can also use nail nippers to cut away dead skin around nails–just be careful not to accidentally damage live tissue!
Filing your nails properly means filing them straight across rather than rounded, which could lead to ingrown toenails. If you have trouble with calluses, try using a foot file that will smooth away rough skin without being too harsh on your nails. Once finished, seal off your pedi with a quick-drying top coat for protection and long-lasting beauty!
Apply Nail Polish
As the final step of your pedicure, apply a top coat. This will extend its durability while giving it an exquisite, shiny finish.
Provided you have all the supplies, performing a DIY at-home pedicure is as straightforward (if not simpler!) as getting it from a nail salon. Lin recommends keeping nail clippers, files, cuticle oil, polish remover, and some beautiful springtime nail colors handy to complete this experience.
An extra bit of preparation goes a long way: before painting your nails, use a cotton pad soaked in rubbing alcohol to wipe down each surface and remove any oily residue that could prevent the polish from adhering properly. You may also add cuticle oil as part of this step to extend its effectiveness even more.
Once your feet are clean and dry, apply a generous dollop of moisturizer. Massage them for several minutes to promote circulation and help the moisturizer absorb into their pores faster.

Quality articles or reviews is the crucial to invite the visitors to go to see the
site, that’s what this web site is providing.
I read this paragraph completely regarding the difference of newest and earlier technologies, it’s amazing article.
I got this website from my buddy who shared with me regarding this website and at the moment this time I am visiting this web page and
reading very informative articles here.
Hi there! This is my first comment here so I just wanted to give
a quick shout out and tell you I really enjoy reading through your blog posts.
Can you recommend any other blogs/websites/forums that go over the same subjects?
Thank you!
I’ll immediately take hold of your rss feed as I can not to find your email subscription hyperlink or
e-newsletter service. Do you’ve any? Please allow me recognize in order that I may subscribe.
Thanks.
I enjoy what you guys are up too. This kind of clever work and exposure!
Keep up the great works guys I’ve included you guys to blogroll.
Fastidious response in return of this difficulty with solid arguments and telling everything on the topic
of that.
Nach meinem Empfinden kauft man bei SEO Agenturen in erster Linie Zeit, Identifikation und Leidenschaft.
Know-How vorausgesetzt. Nicht eine wird leidenschaftlich und mit Identifikation an einem Projekt
arbeiten, das er nur an 5 Stunden im Monat betreut. Aus meiner Erfahrung
gibt es eine Basis-Identifikation ab ca.
Jedoch wird die Arbeit an einem Projekt, dass an 5 Tagen oder mehr in der Woche Agentur- und Schreibtisch-Thema ist sicherlich
mit mehr Identifikation laufen. Bei durchschnittlich 100 € Stundensatz ergibt sich ein monatliches Basis-Volumen von 2.000 €.
2 Arbeitstagen. Wir selber arbeiten im Großen und Ganzen ab 20
Stunden Monats-Budget. Die meisten Agenturen arbeiten mit mindestens 3 Monaten Laufzeit, sodass ein Mindestbudget von 6.000
€ für mich die Basis einer Zusammenarbeit darstellt.
Das ist schwer pauschal zu beantworten, da
das natürlich sehr von welcher Komplexität der Website
und des Themas abhängt. Darunter macht es kaum mal einen Sinn, weil man nichts richtig besiegeln kann.
Den Einstieg in die Agentur-Zusammenarbeit sollte eine
kurze, kostenlose Ersteinschätzung zum tatsächlichen Bedarf
unter Kontrolle bleiben der Angebotserstellung sein. Ein SEO-Experte kann nach wenigen Minuten vergleichsweise gut einschätzen, wie sehr z.B.
Thema Onpage Optimierung brennt und wie groß der Handlungsbedarf ist.
Oh my goodness! Impressive article dude!
Many thanks, However I am going through issues with your RSS.
I don’t understand the reason why I cannot
join it. Is there anyone else getting the same RSS problems?
Anyone that knows the answer will you kindly respond?
Thanx!!
Great post. I was checking continuously this blog and I am impressed!
Extremely useful info specially the last part 🙂 I care for such
information much. I was looking for this particular info
for a very long time. Thank you and best of luck.
Es gibt die besten Modelle unter die Lupe genommen. Hier kommen die Testsieger!
Alle lieben ihn! Der Beach Waves Bob, auch Wavy
Bob oder Wob genannt, gehört längst zu den größten Frisuren-Trends.
Wir zeigen die 7 schönsten Stylings. So verliebt
sind wir in den nostalgischen Frisurentrend Waft Fringe!
Nicht uninteressiert Veränderung? Dabei Waft Fringe eroberst du die Beauty-Herzen und setzt ein echtes Statement!
Dann empfehlen wir dir den Paper Cut Bob. Du hast Zurückflirten einen Haarschnitt für jeden Anlass?
Lohnt sich der Dyson Corrale? Micro Pony: Diese edgy Frisur musst du unbedingt kennen! Kurz, kürzer, Micro Bangs: Wir erklären dir alles, was du
zu dem Pony-Trend wissen musst. Es ist das 500-Euro-Glätteisen von Dyson getestet und sind zu einem
spannenden Ergebnis gekommen. Auf der Suche nach hübschen Vintage-Frisuren? Wir zeigen die schönsten Frisuren der 50er-
und 60er-Jahre modern interpretiert. Der Dyson Airwrap im
Test! COSMO hat den beliebten Hairstyler Dyson Airwrap
unter die Lupe genommen. Der Dyson Airwrap im Test:
So gut ist der Hairstyler wirklich! Alle Ergebnisse auf einen Blick!
Just desire to say your article is as amazing. The clarity in your post is just nice and i
can assume you’re an expert on this subject. Fine with your permission let me to grab
your feed to keep updated with forthcoming post.
Thanks a million and please carry on the enjoyable
work.
I like the helpful info you provide in your articles. I’ll bookmark your weblog and check
again here frequently. I’m quite sure I’ll learn lots of new stuff right here!
Best of luck for the next!
Zu sehen sein auch rechtliche Gründe wie den Datenschutz (DSGVO) für den Einsatz eines SSL-Zertifikates.
Eine Website unter HTTPS zu betreiben ist jedoch nicht zwingend wenn beispielsweise keine Formulare ausgefüllt werden können. In Firmennetzwerken kann
eine solche Seite jedoch von der Firewall abgelehnt werden und darum ist die Verwendung generell empfohlen. Websites
die SSL verwenden, sind daran zu erkennen, dass die Adresse mit https:// beginnt.
30 Euro oder sogar kostenfrei anbieten. Google hat ein kostenloses
Zertifikat namens Let’s Encrypt ins Leben gerufen welches gehäuft Webhoster für eine einmalige Gebühr von ca.
Let’s Encrypt wird von Google (Ranking) vollwertig akzeptiert.
Mehr dazu im HTTPS / SSL Beitrag. Überraschend für viele SEOs war
die Erkenntnis, dass Google bis Jänner 2021 nicht mal einer HTTP/2 fürt Crawling von Webseiten verwendet
und noch immer den Uralt Standard 1.1 verwendet. Bezahlte Zertifikate sind
für ein gutes Ranking unwichtig. Da der HTTP/2 Crawler von Google fortwährend im Test ist wird empfohlen 1.1 bislang nicht abzuschalten wie
es manche Security Tools einige Zeit empfohlen haben.
Wonderful items from you, man. I’ve take into accout your stuff previous to and you’re just too great.
I actually like what you have got here, really like what you’re stating and the way in which
through which you are saying it. You make it entertaining and you still take
care of to stay it sensible. I can not wait to read much more from you.
That is really a great site.
If you desire to take a great deal from this article then you have to
apply these strategies to your won blog.
Hello there! I could have sworn I’ve been to this blog before but
after checking through some of the post I realized
it’s new to me. Anyhow, I’m definitely delighted I found it and I’ll be
bookmarking and checking back frequently!
I absolutely love your blog and find almost all of your post’s to be
what precisely I’m looking for. Does one offer guest writers to write content in your case?
I wouldn’t mind composing a post or elaborating on some of the subjects you write in relation to
here. Again, awesome web log!
This is my first time go to see at here and i am actually
happy to read everthing at alone place.
Great info. Lucky me I came across your site by chance (stumbleupon).
I have saved as a favorite for later!